
Applying Vendor Prepayments Manually
Published on
July 9, 2023 at 11:58:30 PM PDT July 9, 2023 at 11:58:30 PM PDTth, July 9, 2023 at 11:58:30 PM PDT
In addition to applying vendor prepayments to your bills automatically using Auto-Apply, you can apply the prepayments manually. Applying vendor prepayments manually is required when the Auto-Apply option is not enabled or when the conditions for Auto-Apply are not met.
Because Auto-Apply is enabled by default, NetSuite automatically applies the vendor prepayments to the vendor bills when the Auto-Apply conditions are met. If you only want to apply prepayments manually, you must disable Auto-Apply.
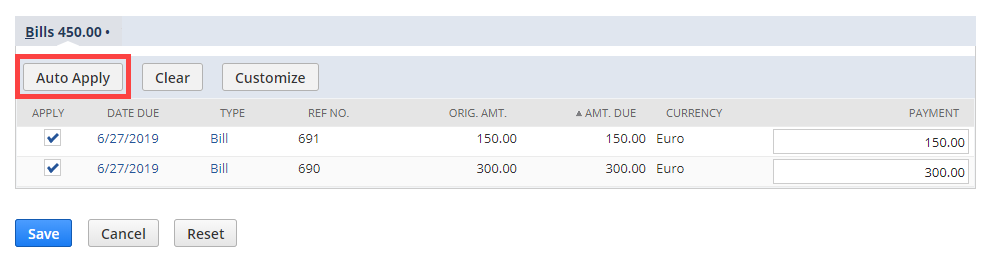
When applying a vendor prepayment against multiple bills manually, you can choose how the prepayment amount is allocated to each bill. The Bills subtab in the Vendor Prepayment Application page shows the bills available for application.

When applying a vendor prepayment against one or more bills, consider the following information:
You can apply the full prepaid amount in a single application, or complete multiple applications using the same vendor prepayment.
You can apply one prepayment to a single bill or to multiple bills, up to the total prepayment amount.
When selecting bills for application, NetSuite autofills the payment amount using the following criteria:
Applies the total bill amount if the bill amount due is less than the unapplied prepayment amount.
Applies the total prepayment amount if the bill amount due is more than the unapplied prepayment amount.
Excludes other bills for application when you apply the total prepayment amount.
Alternatively, you can complete the application using the Auto Apply button on the Bills subtab. Auto Apply applies the prepayment amount on bills up to the total prepayment amount.
Important:TheAuto Applybutton is not related to the vendor prepayment Auto-Apply accounting preference.
The Summary box on the Vendor Prepayment Application page shows the applied and unapplied prepayment amounts as you select bills during the application.
To apply vendor prepayments manually:
On the Vendor Prepayment screen, click theApplybutton.
If you are not on the Vendor Prepayment screen:
Go toTransactions > Payables > Enter Vendor Prepayment > List.
Click theViewlink next to the prepayment transaction you want to apply.
Click theApplybutton.
Note:If theApplybutton is not available, take note of the following:
If you require approval for vendor prepayment transactions, you can only apply prepayments with the status ofApproved.
Verify that you have the required permissions enabled for vendor prepayments.
Complete theVendor Prepaymentform as described in the section below.
Primary Information
ThePayeefield defaults to the original vendor prepayment payee and cannot be changed.
In theAccountfield, select an active Accounts Payable account for this vendor prepayment application.
TheCurrencyfield defaults from the vendor prepayment and cannot be changed.
If there is more than one currency for the payee, you can change theCurrencyfield value. TheCurrencyfield is available when using the Multiple Currencies feature.
TheExchange Ratefield defaults from the vendor prepayment and cannot be changed.
TheExchange ratedepends on the currency selected for the payee. If the currency of the payee is different from your base currency, note the following. TheExchange Ratefield is updated with the corresponding exchange rate value.
To modify theDate, enter or pick a different date. The default value corresponds to the current date.
To modify thePosting Period, select a different posting period from the list. The default value corresponds to the current posting period.
If you use approval routing, the posting period is set upon approval.
To review the vendor prepayment transaction this application comes from, click theApplication Offield.
Classification
If you use NetSuite OneWorld, from theSubsidiarylist, you can select a different subsidiary from the default.
Select theClass,Location, andDepartmentif you track them. When selecting a subsidiary, only theClass,Location, andDepartmentfor that subsidiary are available.
Bills
Check theApplybox for the bill or bills where you want to apply the prepayment.
Note:You must select at least one vendor bill to complete the application.
For the selected bill, enter thePaymentamount for this application.
Alternatively, clickAuto Applyto select bills and amounts automatically.Auto Applyapplies the prepayment amount on bills up to the total prepayment amount.